Container House Assembly Guide
How to Install a Quick-Assembly Container House
Learn how the main components of a quick-assembly container house fit together, including the bottom frame, corner columns, upper frame, floor supports, wall panels, roof and finishing components.
This guide combines a 3 × 6 m reference material list with a complete assembly animation. Explore the main component dimensions, their intended locations and the general installation stages.
Quick-assembly container houses are used for worker accommodation , construction site offices and temporary project buildings. Their steel frames are supplied as separate components for assembly at the project site.
The Hongtai reference material list used in this article covers a container house measuring 3,000 × 5,950 × 2,800 mm externally.
Component dimensions provide useful clues about their positions. Long frame members follow the building’s length, shorter frame members follow its width, and the corner columns provide vertical connections between the lower and upper frames.
Component Identification
1. Identify the Main Steel Frame Components
Before installation, separate the steel components by their function and length. The reference material list identifies the following major frame members.
| Component | Quantity | Listed Length | Likely Position |
|---|---|---|---|
| Upper Long Beams | 2 | 5,630 mm | Two long sides of the upper frame |
| Upper Short Beams | 2 | 2,680 mm | Two ends of the upper frame |
| Lower Long Beams | 2 | 5,630 mm | Two long sides of the bottom frame |
| Lower Short Beams | 2 | 2,680 mm | Two ends of the bottom frame |
| Corner Columns | 4 | 2,480 mm | Four vertical corners |
| Corner Connectors | 8 | 3.5 mm thickness listed | Upper and lower frame corners |
The 5,630 mm beams correspond to the building’s long direction, while the 2,680 mm beams correspond to its short direction.
The corner connection system contributes to the overall assembled dimensions. Individual beam lengths should therefore not be confused with the external building dimensions.
Before Assembly
2. Prepare the Site and Check the Materials
Before assembling the steel frame, check the installation area and confirm that the foundation or supporting surface has been prepared for the approved building configuration.
- Confirm the building position and orientation.
- Check supporting surfaces, levels and foundation locations.
- Verify structural components against the packing list.
- Inspect connections and panel edges for visible transportation damage.
- Organize long beams, short beams, columns and floor supports separately.
- Prepare fastening tools, required temporary supports and suitable safety equipment.
Foundation design, support spacing and anchoring requirements depend on site conditions and the selected building configuration.
For multiple-unit or two-storey projects, confirm the complete structural arrangement before installation starts.
Watch the Assembly Process
Quick-Assembly Container House Installation Video
Watch this 2-minute, 34-second assembly animation to see how the main steel frame, floor supports, wall panels, ceiling and roof components are brought together.
The material dimensions and likely component positions are explained in the sections following the video.
Installation animation, 2:34. This video illustrates the assembly process and does not replace approved model-specific construction drawings or safety instructions.
Bottom Frame
3. Assemble the Bottom Frame and Floor Supports
The reference bottom frame consists of two 5,630 mm long beams and two 2,680 mm short beams, joined using the specified corner connection system.
The material list also includes galvanized square tubes for the lower supporting structure.
| Floor Support Material | Quantity | Length | Section |
|---|---|---|---|
| Lower Supporting Square Tube | 9 | 2,990 mm | 50 × 100 × 1.1 mm |
| Additional Lower Square Tube | 2 | 2,700 mm | 50 × 100 × 1.0 mm |
The nine 2,990 mm supporting tubes are consistent with members positioned across the approximately 3,000 mm width of the building.
The exact positions of the two additional 2,700 mm tubes cannot be established from length alone and must be confirmed from the bottom-frame drawing.
General Assembly Checks
- Identify the bottom-frame members and their orientation.
- Position and connect the long and short frame members using the specified connectors.
- Install the floor-supporting tubes at their approved positions.
- Check the assembled frame dimensions and alignment.
- Complete fastening and anchoring according to the installation instructions.
The installation animation shows the lower frame and supporting members forming the initial structural assembly.
Main Steel Frame
4. Connect the Four Corner Columns and Upper Frame
The reference material list includes four 2,480 mm corner columns and eight corner connectors for the complete frame assembly.
The upper frame contains two 5,630 mm long beams and two 2,680 mm short beams.
The animation illustrates the connection of the corner columns and the assembly of the upper rectangular frame.
- Identify the correct corner-column orientation.
- Connect the columns at their specified lower connection points.
- Provide temporary support where required during erection.
- Position and connect the upper-frame long and short members.
- Check column alignment and frame geometry.
- Verify the specified structural connections before continuing.
Project Installation Support
Need Quick-Assembly Container Houses for Your Project?
Send your quantity, destination and building requirements. We can review the product configuration and installation support scope.
Wall Enclosure
5. Position the Wall Panels and Connecting Profiles
The reference material list includes rock wool sandwich panels for the wall enclosure.
Fifteen panels are listed with a 2,560 mm length, together with one additional panel listed at 3,210 mm.
The 2,560 mm dimension is consistent with wall panels fitted within the 2,800 mm external building height. However, the material list alone does not establish the exact position of every panel.
The purpose and installation orientation of the 3,210 mm panel require confirmation from the wall layout drawing.
Upper Wall Connection Profiles
The reference list includes connecting profiles used between the upper frame and wall-panel system.
| Component | Quantity | Length |
|---|---|---|
| Long Connecting Profile | 2 | 5,680 mm |
| Short Connecting Profile | 2 | 2,770 mm |
These lengths are consistent with the long and short edges of the upper wall enclosure.
The wall installation process includes positioning the panels, checking joint alignment, applying the specified fastening method and completing the required sealing.
Panel selection must also consider the project climate and intended building use. Hongtai offers 50 mm, 75 mm and 100 mm rock wool wall panel options for the quick-assembly system.
Floor Installation
6. Install the Floor Boards
The reference material list includes five 18 mm magnesium oxide floor boards.
| Material | Quantity | Board Size | Thickness |
|---|---|---|---|
| Magnesium Oxide Floor Board | 5 | 2,790 × 1,147 mm | 18 mm |
The 2,790 mm board dimension is consistent with placement across the internal width of a 3,000 mm external-width unit.
The five boards are likely arranged successively along the building length.
Their listed dimensions indicate a possible installation orientation but do not confirm exact clearances, cuts or joint locations.
Before installing the boards, check the floor supporting members and required fixing details.
The reference BOM includes M4.8 × 38 floor fixing screws. Actual screw spacing and installation locations must follow the floor assembly drawing.
Ceiling and Roof
7. Assemble the Ceiling and Roof System
The reference material list identifies upper steel supports, ceiling sheets, roof sheets and insulation materials.
Roof Supporting Members
| Material | Quantity | Length | Section |
|---|---|---|---|
| Upper Supporting Square Tube | 2 | 2,785 mm | 50 × 50 × 1.4 mm |
| Upper Supporting Square Tube | 6 | 1,880 mm | 40 × 60 × 1.0 mm |
| Upper Supporting Square Tube | 1 | 5,700 mm | 40 × 60 × 1.0 mm |
The 5,700 mm member is consistent with a lengthwise roof-supporting component, while the 2,785 mm members correspond approximately to the building’s internal width.
The arrangement of the six 1,880 mm members requires confirmation from the roof framing drawing.
Roof and Ceiling Sheets
| Component | Quantity | Listed Length | Material Detail |
|---|---|---|---|
| YX985 Roof Sheets | 6 | 2,950 mm | 0.35 mm steel sheet |
| YX985 Ceiling Sheets | 6 | 2,780 mm | 0.2 mm steel sheet |
| Glass Wool | 1 pack | Not specified | Roof insulation material |
The 2,950 mm roof-sheet length is consistent with spanning the approximately 3,000 mm external building width.
The 2,780 mm ceiling-sheet length corresponds approximately to a shorter internal width.
The assembly animation includes ceiling components, insulation placement and the external roof covering.
The actual installation order, roof overlaps, drainage and waterproofing details must follow the approved drawings.
Doors, Windows and Finishing
8. Install Doors, Windows and Optional Interior Equipment
The reference material list includes one steel door and two PVC windows.
| Item | Quantity | Listed Size |
|---|---|---|
| Steel Door | 1 | 950 × 2,050 mm |
| PVC Window with Security Bars | 2 | 925 × 1,200 mm |
Install the supplied door and window frames according to the approved opening positions.
Check frame alignment, opening and closing operation, fastening details and perimeter sealing.
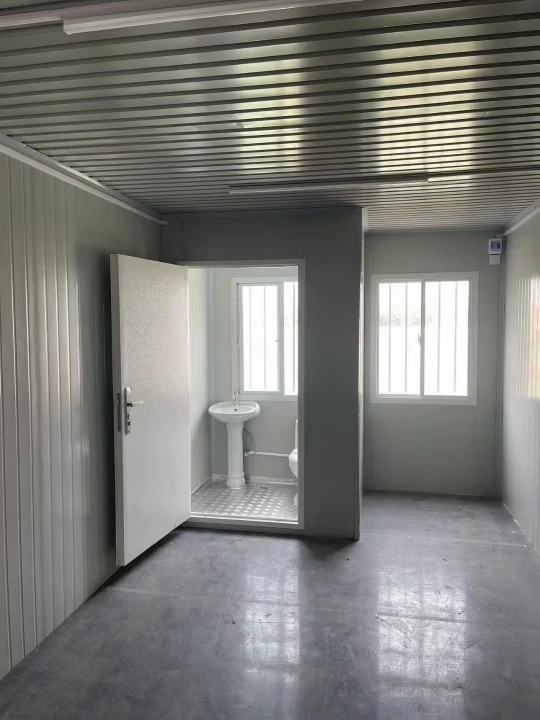
Optional Private Bathroom
Quick-assembly container houses can also be configured with a private bathroom.
Bathroom fixtures, plumbing, drainage and internal partitions depend on the selected layout and confirmed order scope.
Completed container house room with an en-suite bathroom. This video shows a possible room configuration and does not demonstrate the installation process.
Final Inspection
9. Check Structural Connections, Sealing and Finishing
After assembly, inspect the completed building before use.
Structural Checks
- Bottom-frame alignment
- Corner-column connections
- Upper-frame connections
- Floor supporting members
- Specified anchors and fasteners
- Required structural stability checks
Enclosure and Finishing
- Wall-panel alignment
- Roof and ceiling fixings
- Roof and wall joint sealing
- Door and window operation
- Interior finishes
- Electrical and plumbing tests, where applicable
Fasteners Listed in the Reference Material List
| Fastener | Quantity | Listed Use |
|---|---|---|
| M12 × 25 | 66 | Carriage bolts |
| M10 × 80 | 18 | Chassis bolts |
| M12 × 50 | 2 | Container locking bolts |
| M4.8 × 75 | 16 | Wall-panel fixings |
| M4.8 × 38 | 50 | Floor-board fixings |
| M4.2 × 16 | 140 | Ceiling-sheet fixings |
| M5.5 × 25 | 100 | Roof-sheet fixings |
The quantities above come from one reference material list. They do not specify connection torque, fastener spacing, connection strength or the quantities required for other models.
Structural connections, anchoring, waterproofing and applicable safety requirements must be inspected according to the project documentation.
Installation Planning
How Long Does Quick-Assembly Container House Installation Take?
For a standard 3 × 6 m Hongtai quick-assembly container house, two experienced workers can typically complete the basic unit assembly within approximately half a day to one day under suitable conditions.
This reference excludes foundation construction, unloading, utility connections and optional interior fit-out.
The standard quick-assembly frame can normally be assembled without a crane. Conventional flat pack container houses use integrated upper and lower frame assemblies that require crane-assisted installation.
Unloading requirements and handling equipment must be planned separately according to the shipment and site.
See our Container House product specifications for further information on the two building systems.
Frequently Asked Questions
Quick-Assembly Container House Installation FAQ
How can I identify the long and short frame members?
In the reference material list, the main long members are 5,630 mm and the short members are 2,680 mm. They correspond to the long and short directions of the approximately 5.95 × 3.0 m building.
How many floor-supporting tubes are included?
The reference BOM lists nine 2,990 mm lower supporting square tubes and two additional 2,700 mm tubes. Their exact positions must follow the bottom-frame drawing.
What floor boards are used?
The reference material list includes five 18 mm magnesium oxide boards, each measuring 2,790 × 1,147 mm. Other models may use different floor specifications.
Does quick-assembly container house installation require a crane?
Standard quick-assembly frame installation normally does not require a crane. Unloading and other material-handling requirements must be evaluated separately.
How many workers are required?
Two experienced workers can typically complete the basic assembly of a standard 3 × 6 m quick-assembly unit within approximately half a day to one day under suitable conditions. Additional work must be scheduled separately.
Can the house include a private bathroom?
Yes. A private bathroom is available as an optional project configuration. Fixtures, partitions, water supply and drainage must be included in the confirmed order scope.
Is the installation method the same as a conventional flat pack?
No. Conventional flat pack container houses have factory-integrated upper and lower frames that require crane-assisted positioning. Quick-assembly units use separate structural members for on-site assembly.
Is the animation a complete installation manual?
The animation illustrates the general assembly process. The actual installation must follow the approved model-specific drawings, connection details, temporary stability requirements and site safety procedures.